Getting started
So you now have a brand new installation of PaSSHport, but you don't know what to do next…
Example prerequisites
For this tutorial, we will use the following infos :
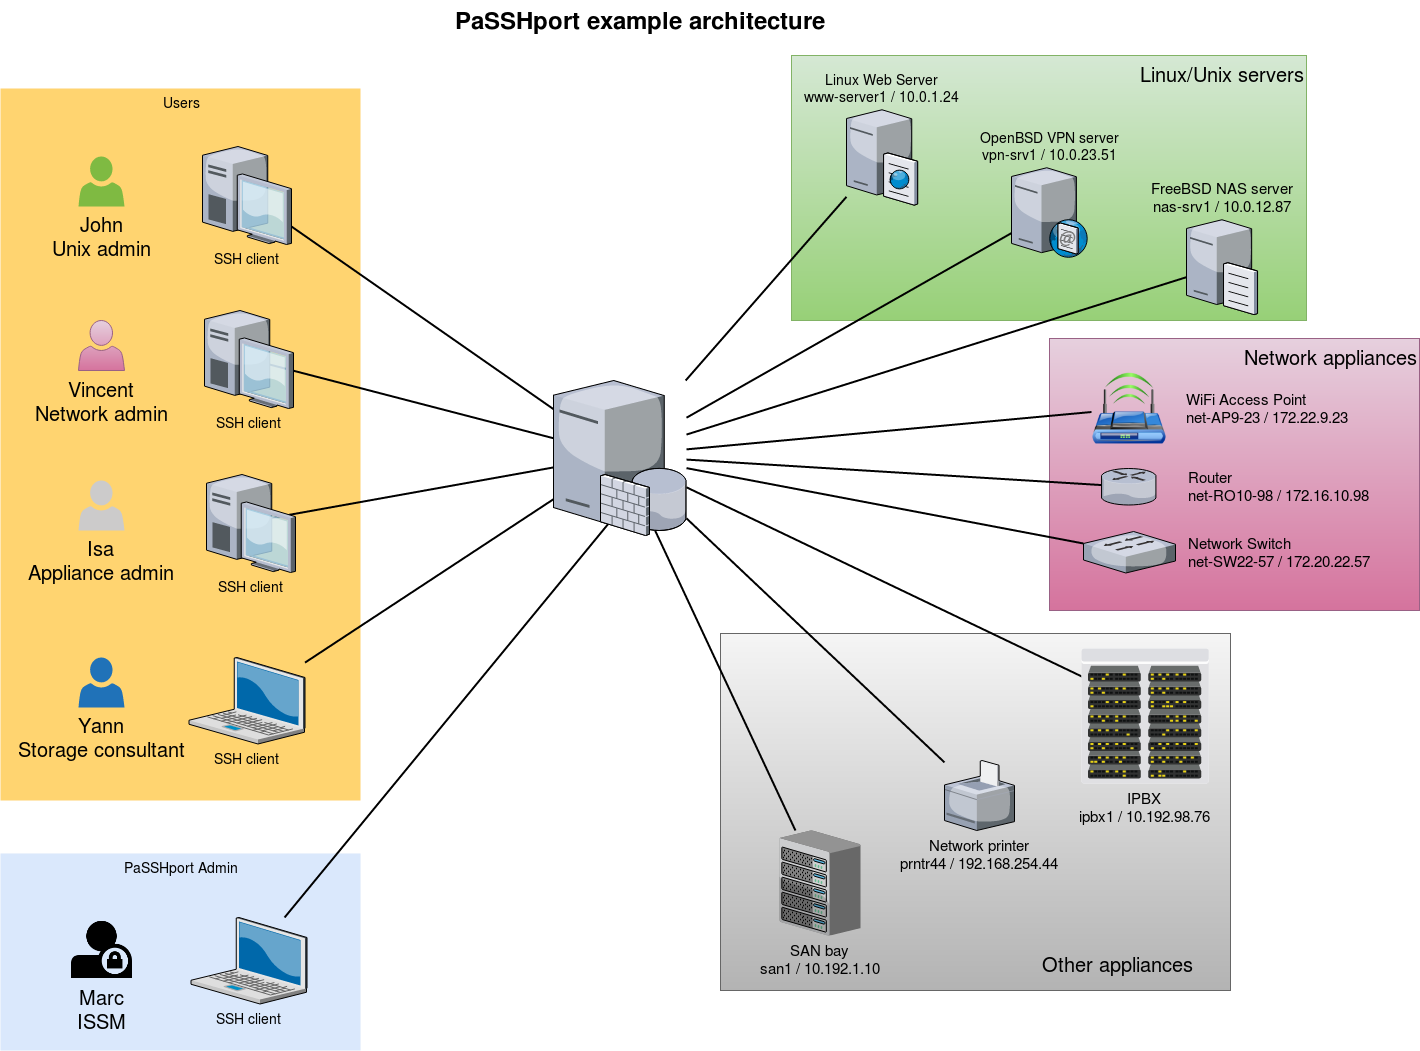
- 1 PaSSHport node
We'll use a monolithic installation of PaSSHport : passhportd, passhport and passhport-admin are on the same host.
3 users
- John, a linux/unix administrator, who needs to access all linux/unix servers
- Vincent, a network administrator, who needs to access all network appliances
- Alice, a general appliance administrator who needs to access all tier appliances
- Yann, a consultant who's here for a temporary mission about storage infrastructure, that need to access the NAS server and a the SAN bay
1 PaSSHport admin
- Marc, the ISSM, who configures PaSSHport, to control all the access rights
3 types of targets
- Linux/Unix servers :
- 1 web server, Linux, www-server / 10.0.1.24
- 1 VPN server, OpenBSD, vpn-srv1 / 10.0.23.51
- 1 NAS server, FreeBSD, nas-srv1 / 10.0.12.87
- Network appliances
- 1 WiFi access points, net-AP9-23 / 172.22.9.23
- 1 router, net-RO10-98 / 172.16.10.98
- 1 network switch, net-SW22-57 / 172.20.22.57
- Other appliances
- 1 IPBX, ipbx1 / 10.192.98.76
- 1 Network printer, prntr44 / 192.168.254.44
- 1 SAN bay, san1 / 10.192.1.10
Configure targets
First of all, we'll include the targets into PaSSHport.
Let's connect to your PaSSHport node, and add the linux target. We can do this as passhport user :
passhport@passhport-server:~$ passhport-admin target create www-server 10.0.1.24
OK: "www-server" -> created
passhport@passhport-server:~$
We can check that the target has been well recorded :
passhport@passhport-server:~$ passhport-admin target list
www-server
passhport@passhport-server:~$
Now let's add the other Linux/Unix server :
passhport@passhport-server:~$ passhport-admin target create vpn-srv1 10.0.23.51
OK: "vpn-srv1" -> created
passhport@passhport-server:~$ passhport-admin target create nas-srv1 10.0.23.51
OK: "nas-srv1" -> created
passhport@passhport-server:~$
Do the same for the network appliances, and the remaining :
passhport@passhport-server:~$ passhport-admin target create net-AP9-23 172.22.9.23
OK: "net-AP9-23" -> created
passhport@passhport-server:~$ passhport-admin target create net-RO10-98 172.16.10.98
OK: "net-RO10-98" -> created
passhport@passhport-server:~$ passhport-admin target create net-SW22-57 172.20.22.57
OK: "net-SW22-57" -> created
passhport@passhport-server:~$ passhport-admin target create ipbx1 10.192.98.76
OK: "ipbx1" -> created
passhport@passhport-server:~$ passhport-admin target create prntr44 192.168.254.44
OK: "prntr44" -> created
passhport@passhport-server:~$ passhport-admin target create san1 10.192.1.10
OK: "san1" -> created
passhport@passhport-server:~$
We now have all our targets configured into PaSSHport.
Special target, with a specific login
We want to be able to connect to the SAN bay, as another user, because Yann should not have access to the SAN bay as the root user, but as "admin" user :
root@passhport-server:~# passhport-admin target create
Name: admin@san1
Hostname: 10.192.1.10
Login (default is root): admin
Port: 22
SSH Options:
Comment: SAN bay, login as admin user, not root.
OK: "admin@san1" -> created
root@passhport-server:~#
The SAN will now be accessible through two targets : "san1" and "admin@san1".
Configure target's groups
We'll group the targets we just created into three groups : unices, network and others.
We create the groups :
passhport@passhport-server:~$ passhport-admin targetgroup create unices
OK: "unices" -> created
passhport@passhport-server:~$ passhport-admin targetgroup create network
OK: "network" -> created
passhport@passhport-server:~$ passhport-admin targetgroup create others
OK: "others" -> created
passhport@passhport-server:~$
Now we put the targets into the corresponding target groups :
passhport@passhport-server:~$ passhport-admin targetgroup addtarget www-server unices
OK: "www-server" added to "unices"
passhport@passhport-server:~$
I'm a bit lazy, so I'll script the remainings :
passhport@passhport-server:~$ for UNICE in vpn-srv1 nas-srv1; do passhport-admin targetgroup addtarget ${UNICE} unices; done
OK: "vpn-srv1" added to "unices"
OK: "nas-srv1" added to "unices"
passhport@passhport-server:~$ for NETAPPLIANCE in net-AP9-23 net-RO10-98 net-SW22-57; do passhport-admin targetgroup addtarget ${NETAPPLIANCE} network; done
OK: "net-AP9-23" added to "network"
OK: "net-RO10-98" added to "network"
OK: "net-SW22-57" added to "network"
passhport@passhport-server:~$ for OTHERAPPLIANCE in ipbx1 prntr44 san1; do passhport-admin targetgroup addtarget ${OTHERAPPLIANCE} others; done
OK: "ipbx1" added to "others"
OK: "prntr44" added to "others"
OK: "san1" added to "others"
passhport@passhport-server:~$
We'll create a last group, that will have all the targets in it (again, I'm gonna script this) :
passhport@passhport-server:~$ passhport-admin targetgroup create all-targets
OK: "all-targets" -> created
passhport@passhport-server:~$ for TARGET in `passhport-admin target list`; do passhport-admin targetgroup addtarget ${TARGET} all-targets; done
OK: "ipbx1" added to "all-targets"
OK: "nas-srv1" added to "all-targets"
OK: "net-AP9-23" added to "all-targets"
OK: "net-RO10-98" added to "all-targets"
OK: "net-SW22-57" added to "all-targets"
OK: "prntr44" added to "all-targets"
OK: "san1" added to "all-targets"
OK: "vpn-srv1" added to "all-targets"
OK: "www-server" added to "all-targets"
passhport@passhport-server:~$
We're now done with the targets/targetgroups, at least for the moment…
Configure the users
We take it for granted that our users have all created a ssh public key (rsa, dsa or ecdsa), and that they gave us the public part. We have all the following keys :
Alice, a 2048 bits RSA key :
ssh-rsa AAAAB3NzaC1yc2EAAAADAQABAAABAQC8JMsMgyRUEMoq31rPTIWpWKgGFQ7fxt5Kray8yzCPga2pohMLstjJeHpWjkVhH8FhRUwCFXOM8zBEykz1IVFjowzFqR9kPvV0fELuIeK/V/42j3izeRH5liXFwotxzfpqTijTxAfj/60IadcUSf5dE8WAiREarrV82ieU5eNZ4FoCH4W0xPS8pEYJDv6hQ8TFHYQCrwHloA3HgzEJgQSFWaS3niMDfNbgbJEOVhXuT2l7pWgSnp1l5jewAq5CB71mMiUyF+zG8FRAYqUKd4VNRN+3/tp+9FEAqGCH3kTuFhFnWCgguQxDxH4XiIj7n2w79ARPzMbn2vTtd+6N0or7 alice@myfirm.com
John, an 521 bits ECDSA key :
ecdsa-sha2-nistp521 AAAAE2VjZHNhLXNoYTItbmlzdHA1MjEAAAAIbmlzdHA1MjEAAACFBAHTlnhl23T9NiHn06wWaDpT1aJqEY0aOW7E4dfu7kQJsmRqg2SWMld6H8Q+bggwCLSkRKubOWyoJkprAfwOP8OArAGPCIr9PeQfC581EVqaev/yJYbKwwPQEaHpiQoHMaBfsgA2BYS5cNVcrOpLk8nHgKSJGEcdYipbZZxqDrLaeX3lBA== john@myfirm.com
Marc, a 4096 bits RSA key :
ssh-rsa AAAAB3NzaC1yc2EAAAADAQABAAACAQDFOU5Saf+epkm79BeSniE7VtYMexJeL6BvXUsKUb7m8W4gnD3YTBW93uykO/6ovi9TfYdm+4nKQ9gUGUgzNyD8o7zW8w6wKogoL24UbJKmkZOCU1IgHJSt1QYIs/qHQZ2MR6S6K2f/1J1joYINPtGpQJ475OZfYQbP79fEdRdylupC8L+fvxkka4C0Uxj0I1VjDCVJCjO0md5oXzN75I2aw+RFWuiiL5P/gHRu+2iff2rdhebJZs4ux8u76LQLzYsG9a85Xlagw6N7/aXWnUZ/9gqoF/qVUHfS8ggesTwEJyNnY7EpPcKRUcwnlonn5CIS++Yo8iqjLd93RjFxShUqXlw9Cct4hdh/clW/QYsJRMfN9860mZ9v9dEitM2X1w8HCCD5NAHGqRRrtONM99kZRxmkCQ/Tb+jXvJ+VAl4qffuPPdxY+Bev7wygm4rVnjF2Ac5ioWb4Zd+zIb712VTQDQlRxsu73yWtHSodeSgPpgCWTjCwW/841QbPGkclnE6DKIwQ/vxC0ggSXouc5G6j0gHu90eQ24XL6Gurqr2C11w9saRyzrYRRlS0Ihkp3rMSteVcvrb1Qi4UGmJCHHSBhvP8jRFH4mbdkSGyzsxtjr8puJc8DiQ1UKG3O9X12m8nbOYeNdIofTw615k0YitoQ/60fdEELQyX+kNFQ2VoCw== marc@myfirm.com
Vincent, a 521 bits ECDSA key :
ecdsa-sha2-nistp521 AAAAE2VjZHNhLXNoYTItbmlzdHA1MjEAAAAIbmlzdHA1MjEAAACFBAHJk+qDLEi283+rUmSek3eEF4PqXYMmQlPTj352w0XO75EGJzfavEDFe0h+Bu39XN/xVc+ypwOb2vv6pcjVsvuHTwHgXR2ElyfE8gGV7mITyXMdDyoWP5N8Ly3s7njNChSL9z3NiG38lg3E4Vg10nbmmoZZCA3WCffV4ugp3lYPnFmtfA== vincent@myfirm.com
And Yann, a 2048 bits RSA key :
ssh-rsa AAAAB3NzaC1yc2EAAAADAQABAAABAQCs9YpOfP9vgViYa1SSntrydEBLGyWGAr9nvEjqHcMwHQb9JEmhIjvk1ctb8+Kns3/52F0hBrxic6k6UPvvvjbtJX33muFv5dd0k1W4lLcYe4ONTFwLOqCph4Is5r9lbZ5KXxhN/8YC/08jBJow0CoYdc+Yr7MlA51+tEQFwPbuB5vHMUteye0IgmaH9MLzXes/j5BUhnBjDscWVQSvNHY4/PKtHvIdvoI1uKAplstuHI6CDqnb0aJ5P9wME3P1lhRwcVDTm48/AMcfmpp5s+DwOmyDGfGXf+hE0cu7ulAkwHBhR6ciJJg1pz4DqraglxyVyrt+PFq6KDeV/7WwoNEP yann@otherfirm.com
With those keys, we can add the users as follow…
- Interactively :
passhport@passhport-server:~$ passhport-admin user create
Email (user name): alice@myfirm.com
SSH Key: ssh-rsa AAAAB3NzaC1yc2EAAAADAQABAAABAQC8JMsMgyRUEMoq31rPTIWpWKgGFQ7fxt5Kray8yzCPga2pohMLstjJeHpWjkVhH8FhRUwCFXOM8zBEykz1IVFjowzFqR9kPvV0fELuIeK/V/42j3izeRH5liXFwotxzfpqTijTxAfj/60IadcUSf5dE8WAiREarrV82ieU5eNZ4FoCH4W0xPS8pEYJDv6hQ8TFHYQCrwHloA3HgzEJgQSFWaS3niMDfNbgbJEOVhXuT2l7pWgSnp1l5jewAq5CB71mMiUyF+zG8FRAYqUKd4VNRN+3/tp+9FEAqGCH3kTuFhFnWCgguQxDxH4XiIj7n2w79ARPzMbn2vTtd+6N0or7 alice@myfirm.com
Comment: Alice is the general applicance admin
OK: "alice@myfirm.com" -> created
passhport@passhport-server:~$
- On a single line, one shot :
passhport@passhport-server:~$ passhport-admin user create john@myfirm.com "ecdsa-sha2-nistp521 AAAAE2VjZHNhLXNoYTItbmlzdHA1MjEAAAAIbmlzdHA1MjEAAACFBAHTlnhl23T9NiHn06wWaDpT1aJqEY0aOW7E4dfu7kQJsmRqg2SWMld6H8Q+bggwCLSkRKubOWyoJkprAfwOP8OArAGPCIr9PeQfC581EVqaev/yJYbKwwPQEaHpiQoHMaBfsgA2BYS5cNVcrOpLk8nHgKSJGEcdYipbZZxqDrLaeX3lBA== john@myfirm.com" --comment="John is the Unices admin. He rocks."
OK: "john@myfirm.com" -> created
passhport@passhport-server:~$
We add the others :
passhport@passhport-server:~$ passhport-admin user create marc@myfirm.com "ssh-rsa AAAAB3NzaC1yc2EAAAADAQABAAACAQDFOU5Saf+epkm79BeSniE7VtYMexJeL6BvXUsKUb7m8W4gnD3YTBW93uykO/6ovi9TfYdm+4nKQ9gUGUgzNyD8o7zW8w6wKogoL24UbJKmkZOCU1IgHJSt1QYIs/qHQZ2MR6S6K2f/1J1joYINPtGpQJ475OZfYQbP79fEdRdylupC8L+fvxkka4C0Uxj0I1VjDCVJCjO0md5oXzN75I2aw+RFWuiiL5P/gHRu+2iff2rdhebJZs4ux8u76LQLzYsG9a85Xlagw6N7/aXWnUZ/9gqoF/qVUHfS8ggesTwEJyNnY7EpPcKRUcwnlonn5CIS++Yo8iqjLd93RjFxShUqXlw9Cct4hdh/clW/QYsJRMfN9860mZ9v9dEitM2X1w8HCCD5NAHGqRRrtONM99kZRxmkCQ/Tb+jXvJ+VAl4qffuPPdxY+Bev7wygm4rVnjF2Ac5ioWb4Zd+zIb712VTQDQlRxsu73yWtHSodeSgPpgCWTjCwW/841QbPGkclnE6DKIwQ/vxC0ggSXouc5G6j0gHu90eQ24XL6Gurqr2C11w9saRyzrYRRlS0Ihkp3rMSteVcvrb1Qi4UGmJCHHSBhvP8jRFH4mbdkSGyzsxtjr8puJc8DiQ1UKG3O9X12m8nbOYeNdIofTw615k0YitoQ/60fdEELQyX+kNFQ2VoCw== marc@myfirm.com"
OK: "marc@myfirm.com" -> created
passhport@passhport-server:~$ passhport-admin user create vincent@myfirm.com "ecdsa-sha2-nistp521 AAAAE2VjZHNhLXNoYTItbmlzdHA1MjEAAAAIbmlzdHA1MjEAAACFBAHJk+qDLEi283+rUmSek3eEF4PqXYMmQlPTj352w0XO75EGJzfavEDFe0h+Bu39XN/xVc+ypwOb2vv6pcjVsvuHTwHgXR2ElyfE8gGV7mITyXMdDyoWP5N8Ly3s7njNChSL9z3NiG38lg3E4Vg10nbmmoZZCA3WCffV4ugp3lYPnFmtfA== vincent@myfirm.com" --comment="Vincent is the network admin."
OK: "vincent@myfirm.com" -> created
passhport@passhport-server:~$ passhport-admin user create yann@otherfirm.com "ssh-rsa AAAAB3NzaC1yc2EAAAADAQABAAABAQCs9YpOfP9vgViYa1SSntrydEBLGyWGAr9nvEjqHcMwHQb9JEmhIjvk1ctb8+Kns3/52F0hBrxic6k6UPvvvjbtJX33muFv5dd0k1W4lLcYe4ONTFwLOqCph4Is5r9lbZ5KXxhN/8YC/08jBJow0CoYdc+Yr7MlA51+tEQFwPbuB5vHMUteye0IgmaH9MLzXes/j5BUhnBjDscWVQSvNHY4/PKtHvIdvoI1uKAplstuHI6CDqnb0aJ5P9wME3P1lhRwcVDTm48/AMcfmpp5s+DwOmyDGfGXf+hE0cu7ulAkwHBhR6ciJJg1pz4DqraglxyVyrt+PFq6KDeV/7WwoNEP yann@otherfirm.com" --comment="Yann is an external consultant, for a temporary mission bout storage infrastructure."
OK: "yann@otherfirm.com" -> created
passhport@passhport-server:~$
As you can see above, I forgot to put a comment on "marc@myfirm.com" account. Let's add one :
passhport@passhport-server:~$ passhport-admin user edit marc@myfirm.com --newcomment="Marc is the ISSM. He access all."
OK: "marc@myfirm.com" -> edited
passhport@passhport-server:~$
Users are now created. Let's put them in usergroups…
Configure usergroups :
Even if in this example we only have one user for each purpose of administration, it's generaly a good idea to add a group for one type skill.
Let's add those groups :
passhport@passhport-server:~# passhport-admin usergroup create unices_admins
OK: "unices_admins" -> created
passhport@passhport-server:~# passhport-admin usergroup create network_admins
OK: "network_admins" -> created
passhport@passhport-server:~# passhport-admin usergroup create appliance_admins
OK: "appliance_admins" -> created
passhport@passhport-server:~# passhport-admin usergroup create super_admins
OK: "super_admins" -> created
passhport@passhport-server:~#
We add the users to each corresponding groups :
passhport@passhport-server:~$ passhport-admin usergroup adduser john@myfirm.com unices_admins
OK: "john@myfirm.com" added to "unices_admins"
passhport@passhport-server:~$ passhport-admin usergroup adduser vincent@myfirm.com network_admins
OK: "vincent@myfirm.com" added to "network_admins"
passhport@passhport-server:~$ passhport-admin usergroup adduser alice@myfirm.com appliance_admins
OK: "alice@myfirm.com" added to "appliance_admins"
passhport@passhport-server:~$ passhport-admin usergroup adduser marc@myfirm.com super_admins
OK: "marc@myfirm.com" added to "super_admins"
passhport@passhport-server:~$
Connect usergroups and targetgroups :
We now can connect each usergroups to targetgroups :
passhport@passhport-server:~# passhport-admin targetgroup addusergroup unices_admins unices
OK: "unices_admins" added to "unices"
passhport@passhport-server:~# passhport-admin targetgroup addusergroup network_admins network
OK: "network_admins" added to "network"
passhport@passhport-server:~# passhport-admin targetgroup addusergroup appliance_admins others
OK: "appliance_admins" added to "others"
passhport@passhport-server:~# passhport-admin targetgroup addusergroup super_admins all-targets
OK: "super_admins" added to "all-targets"
passhport@passhport-server:~#
Special configuration for Yann :
Because Yann is only here for a short mission, and need to access to different targets, that won't be grouped into a targetgroup, so we connect him directly to the targets :
passhport@passhport-server:~$ passhport-admin target adduser yann@otherfirm.com nas-srv1
OK: "yann@otherfirm.com" added to "nas-srv1"
passhport@passhport-server:~# passhport-admin target adduser yann@otherfirm.com admin@san1
OK: "yann@otherfirm.com" added to "admin@san1"
passhport@passhport-server:~#
As you can see above, we did not give Yann access directly to san1 as root, but as admin user, through the admin@san1 target we created before.
Check rights :
We can check what we configured with the "show" sub-command of passhport-admin :
passhport@passhport-server:~$ passhport-admin user show marc@myfirm.com
Email: marc@myfirm.com
SSH key: ssh-rsa AAAAB3NzaC1yc2EAAAADAQABAAACAQDFOU5Saf+epkm79BeSniE7VtYMexJeL6BvXUsKUb7m8W4gnD3YTBW93uykO/6ovi9TfYdm+4nKQ9gUGUgzNyD8o7zW8w6wKogoL24UbJKmkZOCU1IgHJSt1QYIs/qHQZ2MR6S6K2f/1J1joYINPtGpQJ475OZfYQbP79fEdRdylupC8L+fvxkka4C0Uxj0I1VjDCVJCjO0md5oXzN75I2aw+RFWuiiL5P/gHRu+2iff2rdhebJZs4ux8u76LQLzYsG9a85Xlagw6N7/aXWnUZ/9gqoF/qVUHfS8ggesTwEJyNnY7EpPcKRUcwnlonn5CIS++Yo8iqjLd93RjFxShUqXlw9Cct4hdh/clW/QYsJRMfN9860mZ9v9dEitM2X1w8HCCD5NAHGqRRrtONM99kZRxmkCQ/Tb+jXvJ+VAl4qffuPPdxY+Bev7wygm4rVnjF2Ac5ioWb4Zd+zIb712VTQDQlRxsu73yWtHSodeSgPpgCWTjCwW/841QbPGkclnE6DKIwQ/vxC0ggSXouc5G6j0gHu90eQ24XL6Gurqr2C11w9saRyzrYRRlS0Ihkp3rMSteVcvrb1Qi4UGmJCHHSBhvP8jRFH4mbdkSGyzsxtjr8puJc8DiQ1UKG3O9X12m8nbOYeNdIofTw615k0YitoQ/60fdEELQyX+kNFQ2VoCw== marc@myfirm.com
Comment: Marc is the ISSM. He access all.
Accessible target list: ipbx1 nas-srv1 net-AP9-23 net-RO10-98 net-SW22-57 prntr44 san1 vpn-srv1 www-server

Details in access:
Accessible directly:
Accessible through usergroups:
super_admins: www-server ; vpn-srv1 ; nas-srv1 ; net-AP9-23 ; net-RO10-98 ; net-SW22-57 ; ipbx1 ; prntr44 ; san1 ;
Accessible through targetgroups:
passhport@passhport-server:~$
As you can see, the "show" sub-command shows how the user has access to each target. We can see above that Marc has access to all the target we configured, because we placed him in the "super_admins" group.
Here is the example for Yann :
passhport@passhport-server:~$ passhport-admin user show yann@otherfirm.com
Email: yann@otherfirm.com
SSH key: ssh-rsa AAAAB3NzaC1yc2EAAAADAQABAAABAQCs9YpOfP9vgViYa1SSntrydEBLGyWGAr9nvEjqHcMwHQb9JEmhIjvk1ctb8+Kns3/52F0hBrxic6k6UPvvvjbtJX33muFv5dd0k1W4lLcYe4ONTFwLOqCph4Is5r9lbZ5KXxhN/8YC/08jBJow0CoYdc+Yr7MlA51+tEQFwPbuB5vHMUteye0IgmaH9MLzXes/j5BUhnBjDscWVQSvNHY4/PKtHvIdvoI1uKAplstuHI6CDqnb0aJ5P9wME3P1lhRwcVDTm48/AMcfmpp5s+DwOmyDGfGXf+hE0cu7ulAkwHBhR6ciJJg1pz4DqraglxyVyrt+PFq6KDeV/7WwoNEP yann@otherfirm.com
Comment: Yann is an external consultant, for a temporary mission bout storage infrastructure.
Accessible target list: nas-srv1 san1

Details in access:
Accessible directly: nas-srv1 ; san1 ;
Accessible through usergroups:
Accessible through targetgroups:
passhport@passhport-server:~$
You can see above that Yann has a direct access to targets, not through usergroups, or targetgroups.
Let's connect !
Let's say that I'm John, I connect to PaSSHport, using the id_rsa key that I sent to the PaSSHport admin :
john@my-desktop:~$ ssh passhport@passhport-server
Welcome john@myfirm.com.
Here is the list of servers you can access:
1  www-server  10.0.1.24
2  vpn-srv1    10.0.23.51
3  nas-srv1    10.0.12.87
Type the number, name or hostname of the server you want to connect to :
As John, I can see that I can access to 3 servers : www-server, vpn-srv1 and nas-srv1. I can now access to each server, using :
- the number in the first column;
- the name of the server (www-serve…);
- the IP address.
john@my-desktop:~$ ssh passhport@passhport-server
Welcome john@myfirm.com.
Here is the list of servers you can access:
1  www-server  10.0.1.24
2  vpn-srv1    10.0.23.51
3  nas-srv1    10.0.12.87
Type the number, name or hostname of the server you want to connect to : 1
Linux www-server 4.9.0-3-amd64 #1 SMP Debian 4.9.30-2+deb9u3 (2017-08-06) x86_64
root@www-server:~#
John is now on the www-server.
Let's say that I'm now Alice, a Windows user. I'm going to use putty to connect to PaSSHport. Let's configure putty…
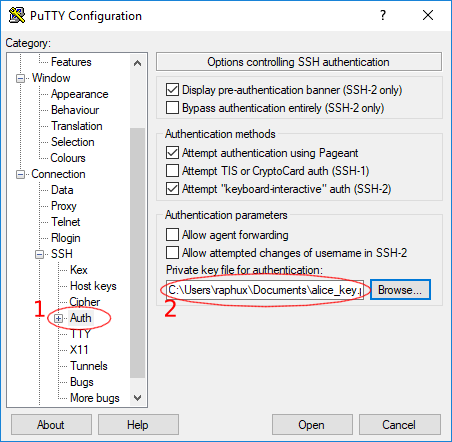
We launch Putty (you can download it from here), and on the left configuration tree, goes to Connection -> SSH -> Auth , then select the ppk key Alice generated (with puttygen for exemple) :
Then we go to Connection -> SSH -> Data , and set the login name as passhport :

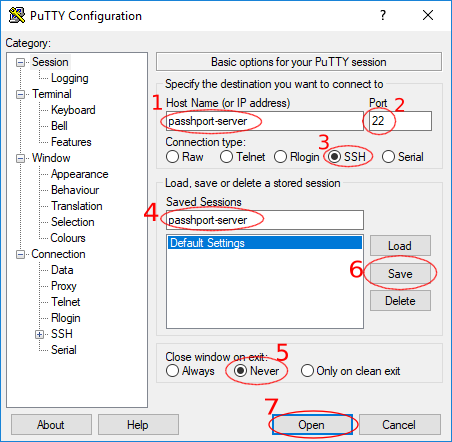
Finally, we go to the root of the configuration tree Session :
- enter the hostname or IP of your PaSSHport server
- enter its SSH port (usually 22)
- select SSH as connection type
- enter a name for this connection configuration
For debugging purpose, it may be useful to Never close window on exit (so you can see the error message).
Save, and click Open !
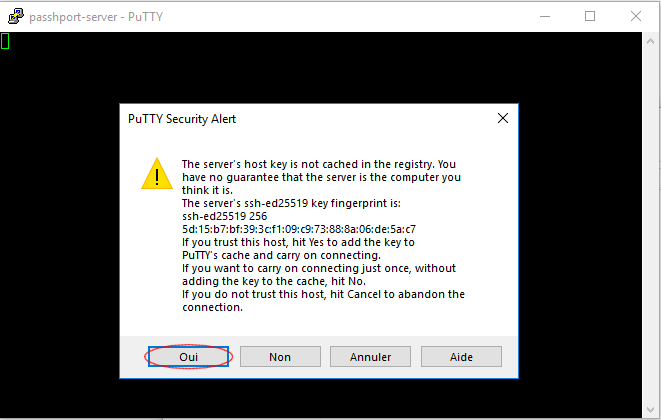
If it's the first time we connect to the PaSSHport server, we'll have a window that says the fingerprint is new, and ask us if we want to accept it… Just accept it :
Then we'll have the PaSSHport prompt, and as we want to connect to IPBX, we select 1 :
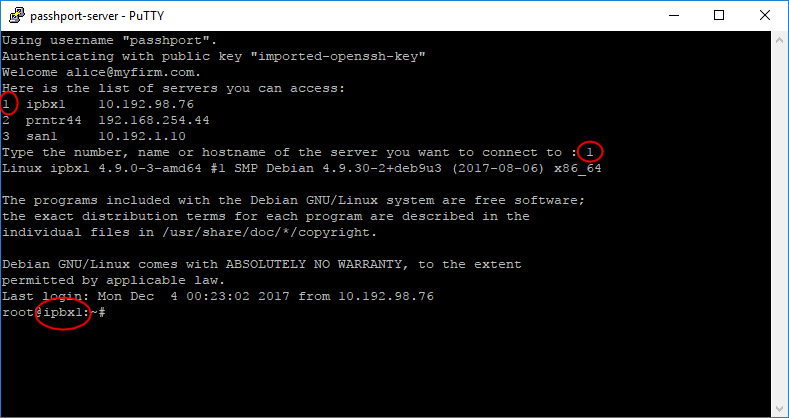
We are now landed on our target.
Last relevant example, Yann, who access nas-srv1 and san1. He uses a linux laptop :
yann@my-laptop:~$ ssh passhport@passhport-server
Welcome yann@otherfirm.com.
Here is the list of servers you can access:
1  nas-srv1    10.0.12.87
2  admin@san1  10.192.1.10  SAN bay, login as admin user, not root.
Type the number, name or hostname of the server you want to connect to :
He can now connect to any of those two servers.
Delete a user
Yann has finished his mission, and left the compagny. There is two way to revoke his access :
- remove all his target ;
- delete the user.
You may prefer the first way if you know that Yann will may come back later to do another mission, so you won't have to recreate the user (get his ssh key, etc…). Here is how you can delete his access…
First, list his rights :
passhport@passhport-server:~$ passhport-admin user show yann@otherfirm.com
Email: yann@otherfirm.com
SSH key: ssh-rsa AAAAB3NzaC1yc2EAAAADAQABAAABAQCs9YpOfP9vgViYa1SSntrydEBLGyWGAr9nvEjqHcMwHQb9JEmhIjvk1ctb8+Kns3/52F0hBrxic6k6UPvvvjbtJX33muFv5dd0k1W4lLcYe4ONTFwLOqCph4Is5r9lbZ5KXxhN/8YC/08jBJow0CoYdc+Yr7MlA51+tEQFwPbuB5vHMUteye0IgmaH9MLzXes/j5BUhnBjDscWVQSvNHY4/PKtHvIdvoI1uKAplstuHI6CDqnb0aJ5P9wME3P1lhRwcVDTm48/AMcfmpp5s+DwOmyDGfGXf+hE0cu7ulAkwHBhR6ciJJg1pz4DqraglxyVyrt+PFq6KDeV/7WwoNEP yann@otherfirm.com
Comment: Yann is an external consultant, for a temporary mission bout storage infrastructure.
Accessible target list: admin@san1 nas-srv1

Details in access:
Accessible directly: nas-srv1 ; admin@san1 ;
Accessible through usergroups:
Accessible through targetgroups:
passhport@passhport-server:~$
You can see that he has access to nas-srv1 and admin@san1, directly. Let's revoke those access :
passhport@passhport-server:~$ passhport-admin target rmuser yann@otherfirm.com admin@san1
OK: "yann@otherfirm.com" removed from "admin@san1"
passhport@passhport-server:~$ passhport-admin target rmuser yann@otherfirm.com nas-srv1
OK: "yann@otherfirm.com" removed from "nas-srv1"
passhport@passhport-server:~$
Yann won't have access to any target anymore :
passhport@passhport-server:~$ passhport-admin user show yann@otherfirm.com
Email: yann@otherfirm.com
SSH key: ssh-rsa AAAAB3NzaC1yc2EAAAADAQABAAABAQCs9YpOfP9vgViYa1SSntrydEBLGyWGAr9nvEjqHcMwHQb9JEmhIjvk1ctb8+Kns3/52F0hBrxic6k6UPvvvjbtJX33muFv5dd0k1W4lLcYe4ONTFwLOqCph4Is5r9lbZ5KXxhN/8YC/08jBJow0CoYdc+Yr7MlA51+tEQFwPbuB5vHMUteye0IgmaH9MLzXes/j5BUhnBjDscWVQSvNHY4/PKtHvIdvoI1uKAplstuHI6CDqnb0aJ5P9wME3P1lhRwcVDTm48/AMcfmpp5s+DwOmyDGfGXf+hE0cu7ulAkwHBhR6ciJJg1pz4DqraglxyVyrt+PFq6KDeV/7WwoNEP yann@otherfirm.com
Comment: Yann is an external consultant, for a temporary mission bout storage infrastructure.
Accessible target list:

Details in access:
Accessible directly:
Accessible through usergroups:
Accessible through targetgroups:
passhport@passhport-server:~$
The second option, is to delete the user :
passhport@passhport-server:~$ passhport-admin user delete yann@otherfirm.com
Email: yann@otherfirm.com
SSH key: ssh-rsa AAAAB3NzaC1yc2EAAAADAQABAAABAQCs9YpOfP9vgViYa1SSntrydEBLGyWGAr9nvEjqHcMwHQb9JEmhIjvk1ctb8+Kns3/52F0hBrxic6k6UPvvvjbtJX33muFv5dd0k1W4lLcYe4ONTFwLOqCph4Is5r9lbZ5KXxhN/8YC/08jBJow0CoYdc+Yr7MlA51+tEQFwPbuB5vHMUteye0IgmaH9MLzXes/j5BUhnBjDscWVQSvNHY4/PKtHvIdvoI1uKAplstuHI6CDqnb0aJ5P9wME3P1lhRwcVDTm48/AMcfmpp5s+DwOmyDGfGXf+hE0cu7ulAkwHBhR6ciJJg1pz4DqraglxyVyrt+PFq6KDeV/7WwoNEP yann@otherfirm.com
Comment: Yann is an external consultant, for a temporary mission bout storage infrastructure.
Accessible target list:

Details in access:
Accessible directly:
Accessible through usergroups:
Accessible through targetgroups:
Are you sure you want to delete yann@otherfirm.com? [y/N] y
OK: "yann@otherfirm.com" -> deleted
passhport@passhport-server:~$
Conclusion
You should now be able to use the basic functions of PaSSHport.